Learn how to measure a 5 lug bolt pattern correctly with our step-by-step guide. Avoid common mistakes and ensure accurate measurements for your vehicle.
Understanding Lug Bolt Patterns
What is a Lug Bolt Pattern?
When it comes to understanding lug bolt patterns, it’s essential to grasp the concept of how these patterns are measured and categorized. A lug bolt pattern refers to the arrangement of the lug bolts on a wheel hub. These lug bolts are responsible for securing the wheel to the vehicle, ensuring a safe and stable connection. The lug bolt pattern is typically represented by a numerical value that indicates the number of lug bolts on the wheel hub and the distance between them.
Common Lug Bolt Pattern Sizes
Lug bolt patterns come in various sizes, each corresponding to different vehicles and applications. The most common lug bolt pattern sizes include 4×100, 5×114.3, and 6×139.7. The first number in the lug bolt pattern represents the number of lug bolts on the wheel hub, while the second number indicates the distance between them in millimeters. For example, a 4×100 lug bolt pattern means there are 4 lug bolts on the wheel hub, with a distance of 100mm between each bolt.
- Common lug bolt pattern sizes include:
- 4×100
- 5×114.3
- 6×139.7
Understanding lug bolt patterns is crucial when it comes to selecting the right wheels for your vehicle. By knowing the lug bolt pattern size, you can ensure a proper fit and avoid compatibility issues. Next, we’ll explore the tools needed for measuring lug bolt patterns accurately.
Tools Needed for Measurement
Tape Measure
When it comes to measuring lug bolt patterns, a tape measure is an essential tool to have on hand. This simple yet effective tool allows you to easily measure the distance between lug bolts with precision. Make sure to use a tape measure that is long enough to reach across the wheel and provide an accurate measurement.

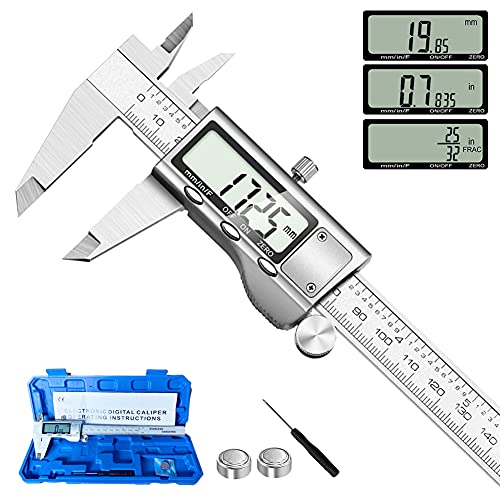
Digital Caliper
For even more precise measurements, a digital caliper is a handy tool to have in your arsenal. This tool allows you to measure the exact distance between lug bolts with digital accuracy. With a digital caliper, you can ensure that your measurements are as precise as possible, helping you to determine the correct lug bolt pattern size for your vehicle.
In summary, having both a tape measure and a digital caliper in your toolkit will ensure that you can accurately measure lug bolt patterns with ease. Whether you prefer the simplicity of a tape measure or the precision of a digital caliper, having both tools on hand will make the measurement process smooth and efficient.
Steps to Measure 5 Lug Bolt Pattern
Step 1: Count the Number of Lugs
When it comes to measuring a 5 lug bolt pattern, the first step is to count the number of lugs on the wheel. The lug nuts are the nuts that secure the wheel to the hub of the vehicle. By counting the number of lug nuts, you can determine the lug bolt pattern of the wheel. Most commonly, you will find wheels with 4, 5, 6, or 8 lugs, but there are also wheels with other numbers of lugs.
To count the number of lugs, simply look at the wheel and identify each lug nut. It’s important to ensure that you are counting all the lugs accurately, as even missing one lug can throw off your measurements. Take your time and double-check your count to make sure you have the correct number of lugs.
Once you have counted the lugs, you can move on to the next step of measuring the distance between the lug bolts.
 MCGARD 65557BK Black SplineDrive Wheel Installation Kit (M12 x 1.5 Thread Size) - for 5 Lug Wheels
Step 2: Measure the Distance between Lug Bolts
After counting the number of lugs, the next step in measuring a 5 lug bolt pattern is to measure the distance between the lug bolts. This distance is crucial in determining the bolt pattern of the wheel, as it will help you identify the exact spacing between each lug nut.
To measure the distance between lug bolts, you will need a measuring tool such as a tape measure or a digital caliper. Place the measuring tool across the center of one lug nut and measure the distance to the center of the lug nut directly across from it. This measurement will give you the center-to-center distance between the lug bolts.
It’s important to measure accurately and precisely to ensure that you get the correct bolt pattern. Even a small mistake in measurement can lead to inaccurate results. Take your time and make sure to measure across the center of the lug nuts for the most precise measurement.
By following these steps, you can accurately measure a 5 lug bolt pattern and ensure that you get the right size wheel for your vehicle. Remember to double-check your measurements and measure carefully to avoid any mistakes.
Tips for Accurate Measurement
Double-Check Your Measurements
When it comes to measuring lug bolt patterns, accuracy is key. One of the most important tips to keep in mind is to always double-check your measurements. Even the smallest mistake can lead to a mismatched lug pattern, which can cause serious issues when it comes to installing your wheels. Take your time and ensure that you have measured correctly before proceeding.

Measure Across the Center of the Lug Bolts
Another crucial tip for accurate measurement is to measure across the center of the lug bolts. This means that you should measure from the center of one lug bolt to the center of the opposite lug bolt, rather than measuring from the edges. This will give you the most precise measurement possible and ensure that your new wheels fit perfectly.
- Always double-check your measurements before proceeding.
- Measure across the center of the lug bolts for the most accurate results.
By following these simple tips, you can ensure that you get the most accurate measurements possible when determining your lug bolt pattern. This will help you avoid any costly mistakes and ensure that your new wheels fit perfectly on your vehicle. So take your time, double-check your measurements, and measure across the center of the lug bolts for the best results.
Common Mistakes to Avoid
Measuring from the Edge of the Bolt Hole
One of the most common mistakes people make when measuring lug bolt patterns is measuring from the edge of the bolt hole. This can lead to inaccurate measurements and ultimately result in purchasing the wrong lug pattern for your vehicle. When measuring from the edge of the bolt hole, you are not capturing the true center of the lug bolt, which is crucial for getting the correct measurement.
To avoid this mistake, always measure from the center of the lug bolt rather than the edge. This will ensure that you are getting an accurate measurement and will help prevent any errors when it comes to selecting the right lug pattern for your vehicle.
Using Incorrect Measurement Units
Another mistake to avoid when measuring lug bolt patterns is using incorrect measurement units. It is essential to use the correct units when measuring the distance between lug bolts to ensure accuracy. Using the wrong units can lead to miscalculations and ultimately result in purchasing the wrong lug pattern.
When measuring lug bolt patterns, always use the appropriate measurement units, whether it be inches or millimeters. Make sure to double-check your measurements and convert them to the correct units if necessary. This simple step can save you time and money in the long run by ensuring that you are selecting the right lug pattern for your vehicle.
In conclusion, measuring lug bolt patterns accurately is essential to ensure that you are purchasing the correct pattern for your vehicle. By avoiding common mistakes such as measuring from the edge of the bolt hole and using incorrect measurement units, you can save yourself from potential errors and make the process smoother. Remember to always measure from the center of the lug bolt and use the right units to guarantee accuracy.