Discover the essential tools and techniques needed to bend brake lines effectively, including how to properly flare the ends for a secure installation in your vehicle.
Tools Needed
When it comes to working on brake lines, having the right tools is essential to ensure a job well done. In this section, we will discuss the three main tools you’ll need to have on hand: a tubing bender, a flaring tool, and a deburring tool.
Tubing Bender
A tubing bender is a must-have tool for anyone looking to bend brake lines with precision. This tool allows you to create smooth, accurate bends in the tubing without causing any kinks or weak spots. When selecting a tubing bender, consider the size of the tubing you will be working with and choose a tool that is suitable for that diameter. Using a tubing bender will make the bending process much easier and ensure that your brake lines are properly shaped for optimal performance.
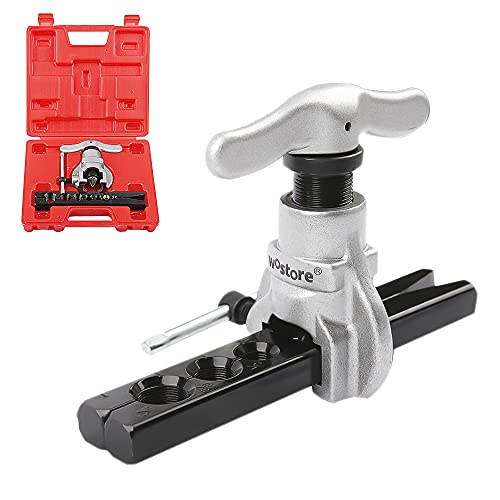
Flaring Tool
A flaring tool is another essential tool for working on brake lines. This tool is used to create flares at the ends of the tubing, which are necessary for connecting the brake lines to fittings securely. Flares help to prevent leaks and ensure a tight seal, so it is important to use a flaring tool correctly to achieve the desired results. When using a flaring tool, make sure to clamp the tubing securely and apply pressure evenly to create a uniform flare. Checking for proper flares is crucial to the success of your brake line installation.
Deburring Tool
Lastly, a deburring tool is essential for removing any burrs or rough edges from the cut ends of the tubing. Burrs can cause leaks and weaken the integrity of the brake lines, so it is important to deburr the cut ends before installing the lines. A deburring tool will ensure that the ends of the tubing are smooth and free from any imperfections, allowing for a secure connection to fittings. Using a deburring tool is a simple yet crucial step in the brake line installation process that should not be overlooked.

Preparing the Brake Line
Measure and Mark
Before you begin working on your brake line, it is crucial to accurately measure and mark where you will need to cut. Using a measuring tape or ruler, determine the length of brake line you will need for your specific vehicle. Make sure to account for any bends or curves in the line as well. Once you have the measurements, use a pencil or marker to clearly mark the cutting points on the tubing.
Cut the Line
With the brake line properly measured and marked, it’s time to make the cut. Using a tubing cutter or hacksaw, carefully cut the tubing at the marked points. Make sure to apply even pressure and keep the cut as straight as possible to ensure a clean and precise cut. Avoid using excessive force, as this could result in jagged edges or an uneven cut.
Deburr the Cut End
After cutting the brake line, it is essential to deburr the cut end to prevent any sharp edges that could potentially damage the fittings or cause leaks. A deburring tool is the best option for this task, as it can quickly and effectively remove any burrs or rough edges left from the cutting process. Simply insert the deburring tool into the cut end of the tubing and rotate it to smooth out the edges.
By following these steps to prepare your brake line, you will ensure a proper fit and secure connection when it comes time to install it in your vehicle. Taking the time to measure accurately, cut cleanly, and deburr the ends will result in a professional-looking finish that is both safe and reliable. Remember, attention to detail in the preparation stage will make the rest of the brake line installation process much smoother and more successful.
Bending Techniques
Using a Bender Tool
When it comes to bending brake lines, using a bender tool can make the process much easier and more precise. Bender tools are specifically designed to bend tubing without causing kinks or deformities. They come in various sizes to accommodate different diameters of tubing. To use a bender tool, simply place the tubing into the tool and slowly apply pressure to bend it to the desired angle. Make sure to measure and mark the tubing before bending to ensure accuracy.
- Measure and mark the tubing before bending
- Place the tubing into the bender tool
- Slowly apply pressure to bend the tubing
- Check the angle to ensure it matches your requirements
Using a Vice and Hammer
If you don’t have access to a bender tool, you can also bend brake lines using a vice and hammer. While this method may not be as precise as using a bender tool, it can still be effective with some practice. Simply place the tubing in the vice and carefully hammer it to the desired angle. Be sure to take your time and make small adjustments as needed to avoid over-bending or kinking the tubing.
- Secure the tubing in a vice
- Carefully hammer the tubing to bend it
- Make small adjustments as needed
- Check the angle for accuracy
Using a Tube Bender
Another option for bending brake lines is to use a tube bender. Tube benders are similar to bender tools but are specifically designed for bending tubing. They come with various dies to accommodate different tubing sizes and can create precise bends with ease. To use a tube bender, simply insert the tubing into the die and slowly crank the handle to bend the tubing to the desired angle. This method is great for achieving professional-looking bends without the risk of damaging the tubing.
- Choose the appropriate die for your tubing size
- Insert the tubing into the die
- Slowly crank the handle to bend the tubing
- Check the angle for accuracy
Flaring the Ends
Clamp in Flaring Tool
When it comes to flaring the ends of your brake line, one of the first steps is to securely clamp the line in the flaring tool. This ensures that the line remains stable and in place while you apply pressure to create the flare. The clamp should be tight enough to hold the line firmly, but not so tight that it damages the line itself.
Apply Pressure to Flare
Once the line is securely clamped in the flaring tool, it’s time to apply pressure to create the flare. This step requires a steady hand and a good amount of force to ensure that the flare is formed correctly. Be sure to follow the instructions provided with your flaring tool to ensure that you are applying the right amount of pressure for the size of your brake line.
Check for Proper Flare
After you have applied pressure to flare the end of the brake line, it’s important to check for a proper flare. A proper flare will have a smooth, uniform shape and will fit securely into the fitting it is meant to connect to. Take the time to inspect the flare closely to ensure that it meets the necessary specifications for your brake system.

- Is the line securely clamped in the flaring tool?
- Are you applying enough pressure to create a proper flare?
- Have you checked the flare for any imperfections or inconsistencies?
Remember, the flaring process is crucial to the overall functionality of your brake system, so it’s important to take your time and ensure that each flare is done correctly. By following these steps and paying attention to detail, you can successfully flare the ends of your brake line and ensure a secure connection for your vehicle’s braking system.
Installing the Brake Line
Connect to Fittings
When it comes to installing a brake line, one of the most crucial steps is connecting it to the fittings. This ensures that the brake fluid can flow smoothly through the line, allowing for proper braking performance. Before you begin this process, make sure you have the correct fittings for your specific vehicle make and model. It’s important to double-check the compatibility to avoid any leaks or malfunctions down the line.
To connect the brake line to the fittings, start by carefully threading the fittings onto the brake line. Make sure they are securely tightened to prevent any leaks. Once the fittings are in place, use a wrench to tighten them further, ensuring a snug and secure connection. Remember, a loose fitting can lead to brake fluid leakage, which can be dangerous and compromise your braking system.
Secure with Clips
In addition to connecting the brake line to the fittings, it’s essential to secure it in place with clips. These clips help keep the brake line in position, preventing it from moving or vibrating while driving. This added stability ensures that the brake line remains intact and functional, even under harsh driving conditions.
To secure the brake line with clips, position the line along the designated path and use the clips to hold it in place. Make sure the clips are firmly attached to the vehicle’s frame or body, providing a stable anchor for the brake line. This step is crucial for maintaining the integrity of the brake system and preventing any potential damage or wear over time.

Bleed the Brake System
Once the brake line is connected to the fittings and securely in place with clips, the final step in the installation process is bleeding the brake system. This is necessary to remove any air bubbles that may have entered the system during the installation process. Air bubbles can compromise the effectiveness of the brakes, leading to spongy or unresponsive pedal feel.
To bleed the brake system, you will need a brake bleeding kit and a helper to assist you. Start by locating the bleeder valve on each brake caliper and attaching the tubing from the bleeding kit. Have your helper press the brake pedal while you open the bleeder valve, allowing air and old fluid to escape. Repeat this process until all air bubbles are removed, ensuring a firm and responsive brake pedal.
In conclusion, installing a brake line requires attention to detail and precision to ensure optimal performance and safety. By following these steps to connect the line to fittings, secure it with clips, and bleed the brake system, you can maintain a reliable braking system that keeps you safe on the road. Remember, proper installation is key to the overall functionality of your vehicle’s braking system.